March 10, 2017
How to Fix a Partly Finished Design
Embroidery mistakes happen, and it’s not always feasible to start over. Luckily, there are ways to fix a partly finished design.
Everyone makes mistakes now and then. When that happens, you need to weigh the cost of reordering and replacing the item versus the time you would spend repairing the mistake. Sometimes it makes no sense to spend the time on damage control. For instance, I rarely fix embroidery mistakes on caps, unless it’s a style that can’t be shipped quickly or was a totally irreplaceable item.

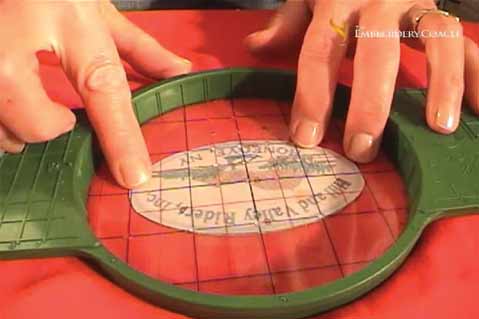
If you decide to fix your mistakes, here is a 10-step process to help embroiderers match up a design taken out of the hoop before it was finished. This is a very common mistake, especially if you’re running a multi-head machine and run out of bobbin, but the machine didn’t stop. In your haste to unhoop, you discover too late that the design wasn’t finished sewing out. Using this simple method, you can rehoop and match up the design perfectly.
1. Print a copy of your worksheet from your design software. Make sure you print crosshairs or lines on the sheet.
2. Cut out the worksheet so it’s the same size as your finished design. You now have a paper pattern. Look at it closely to get some good defining lines to match it up with your design.
3. Cut out the first and last letter sewn in your design. Then, lay the paper pattern over the embroidery and line it up. Tape the paper to hold it in place. Lift the edges of the pattern to ensure the letters fall in the right position.
4. Place the bottom of your hoop under the garment. Position it in the center of your design. Don’t forget to put new backing on your hoop. If you’re not using a hooping device, you can tape the backing around the hoop to secure it. I overlay a grid template to help with placement, but if you don’t have a template, use the inside of your hoop: Mark vertical and horizontal lines from the edge of your paper pattern to the outer edges of where the design will line up with the vertical and horizontal lines in your hoop. You can use a sharp-edged piece of soap to mark the garment.
5. Attach the top of your hooping frame. Match up the hoop’s center lines with your grid or the marks you made on your garment. They need to line up exactly for this process to work.
6. Remove the grid template. The start/stop position of your paper design will be at the correct location in the center of the hoop.
7. Mark the start/stop position in your software. Make sure it stays in the center of your design. Delete everything that has already been embroidered and is correct. Leave everything that still needs to be sewn. This will be your new design. Save it with a new name, so you don’t override the original design. Make sure the new design starts in the same location as the original.
8. Place the garment in the machine. Line it up vertically and horizontally. Remove the thread from the needle to start so everything lines up with the last letter finished. Hold the thread tight if you don’t have a button to turn off the embroidery head, because you don’t want it to register a thread break. Start the machine at a very slow speed or walk it, while holding the start button to make sure the design is lined up.
9. Stop and rethread. Then remove the paper template and start the machine.
10. Finish sewing the design. If you followed this method, everything should match, and no one will ever know you made a mistake.

Product Hub
Find the latest in quality products, must-know trends and fresh ideas for upcoming end-buyer campaigns.