March 13, 2019
How to Eliminate Thread Breaks
Time is money, and money is time; that’s why thread breaks are the bane of every embroiderer’s existence. Whenever you have to stop and rethread: Ka-ching! Ka-ching! So what are some steps you can take to keep thread breaks to a minimum? You may be surprised to discover it’s rarely about the thread. If you’re experiencing too many thread breaks and too much lost production time, here are 12 points to check before losing patience and sending that thread cone into orbit.
1. Needle Condition
Did you know the average life span of an embroidery needle is eight hours of stitching? It’s not common practice to check or change needles as often as necessary, so the needle is a top place you’ll want to check. Needles can develop a burr in or around the eye, causing thread to fray and break. Improper hooping can result in a needle becoming bent if it hits the side of the hoop. Make a point of performing proper maintenance and change your needles on a regular basis.
2. Tensioning
As important as needle and thread care, proper tensioning is an important step to take before each project you do. New to the market is a digital tension gauge, which measures both top and bobbin thread tension (there are also separate gauges for each if you prefer). Note that polyester threads require higher tensions than rayon; thread manufacturers can supply you with ranges of proper tensioning for each type of thread so you know what numbers you’re aiming for so the thread runs well on your machine.
3. Thread Quality
As I wrote earlier, thread breaks typically aren’t due to the thread. That being said, thread quality is still important. Like much in life, you get what you pay for, and embroidery thread isn’t the right place to go cheap. Saving pennies on inferior thread can cost dollars in lost production time. Also, inferior thread that’s likely to fade or change color in the sun or when laundered will have customers complaining and, even worse, looking elsewhere for stitching that holds up over time and wear.

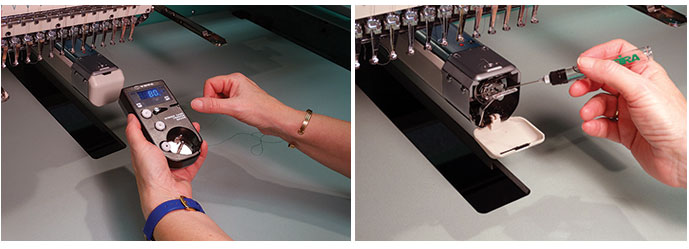
[At left] You should check your machine tension before every embroidery project you undertake; [At right] Regular oiling is a must to keep your embroidery machine in tip-top condition and avoid thread breaks.

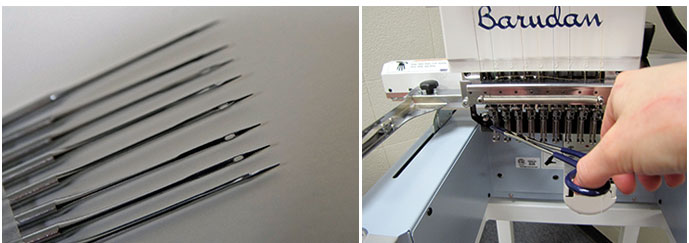
[At left] When it comes to needle size, be sure to check your manufacturer’s recommendations, especially if you’re using specialty threads; [At right] It’s important to change your embroidery needles regularly.
4. Wrong-Size Needle
While 40-weight is the standard size for general purpose embroidering, there are projects that call for specialty threads. Always go by the manufacturer’s recommendations for which size needles to use with specialty threads. A 60-weight thread for small lettering or fine detail will produce the best results with a smaller needle, and a thicker 12-weight wool or cotton blend will need a larger needle. While it’s important to test specialty threads to increase the effects and the quality of your stitch outs, it’s equally important to change needles to accommodate the change from 40-weight embroidery thread.
5. Thread Care
Thread storage is a very important contributor to the lifespan of embroidery thread. Aged or damaged thread becomes brittle and prone to poor performance, so it’s wise to store your thread out of direct sunlight, protected from dust and not subject to spikes in temperature or humidity. In addition, never use adhesive tape to hold a loose end in place. Tape residue on the thread can gum up the eye of the needle, affecting how the thread runs.
6. Adhesive Spray
This is a great tool when used properly, but overuse and/or not allowing the spray to dry thoroughly can cause the adhesive to impair your needles and prevent the smooth running of a design. If you use adhesive spray on a regular basis, make certain that cleaning your needle and thread hook is a regular part of machine maintenance.
7. Lint Buildup
Some specialty threads, such as cotton or wool blends, are prone to lint build-up under the needle plate and in the bobbin case. Use canned air to keep the parts around your needle clean and functioning smoothly.
8. Frequent Lubrication
Constant use or temperature changes can cause the thread hook to dry out quickly. If your machine is running non-stop, the hook assembly should be lubricated every four to six hours.
9. Stitches Per Minute
If a design is particularly dense or includes specialty threads, it may be necessary to slow the speed of your machine. You’ll want to manage and keep to a minimum the amount of stress on your thread.
10. Threading
It sounds basic, but if you rethread your machine, be sure the thread passes through all the thread guides. You may find a wrong turn that’s accounting for too much stress on the thread.
11. Machine Timing
When embroidering with thin or thick specialty threads, always use the needle recommended by the thread manufacturer for best results. If you find that the rotary hook is “splicing” the top thread, causing the thread to bunch up above the needle, chances are the timing of your machine is off for that combination of thread and needle. If you don’t want to change the timing on your machine, try going up a needle size when embroidering with the thin thread, or down a needle size when working with thicker threads. Broken needles and poor stitch results can also occur from bad timing.
12. Let Go
Never hold on to the end of your thread when you start up the machine. It’s unnecessary, and holding the thread taut puts unnecessary tension on the needle and thread.
Watch This!
In this video from Gunold, veteran embroidery machine tech Bill Garvin demonstrates how to replace your embroidery machine’s needle like a pro.
Alice Wolf is the manager of education and publications at Madeira USA. Contact her at awolf@madeirausa.com; (800) 225-3001, ext. 107.